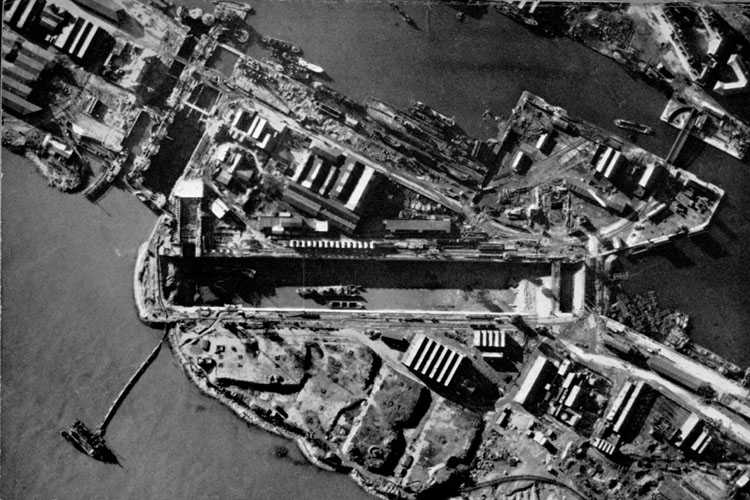
In the early hours of March 28th, 1942, the docks of Saint-Nazaire, France, were the focal point of a scene that could be described as something from a Hollywood movie. Under the cover of darkness, an explosive-laden destroyer, HMS Campbeltown, rammed the gates of the German-held dry dock as the clock ticked down to what would be her utterly devastating curtain call. What prompted this audacious move by the Allies, and did they succeed? Read on to find out more!
From the very outbreak of WWII, German heavy raiders posed a constant threat to British convoy routes in the Atlantic. Although threats from the likes of Admiral Scheer, Scharnhorst, and Gneisenau were mostly foiled by British battleships, the dry docks in Saint-Nazaire played a key strategic role in facilitating the harassment and had to be eliminated.
However, there were a couple of key obstacles to overcome in order to achieve their objective. The first concerned the delivery of the explosive payload, with airborne torpedo raids being negated by the shallow waters surrounding the dock. This made it impossible for their torpedoes to effectively operate. The second issue came in the form of the sturdiness of the dock gates themselves. This factor posed a real challenge, in that a significant amount of explosives would be required to destroy them. A complex problem such as this demanded a complex and unorthodox solution...
It would soon become clear that in order to breach the dock gates and cripple Saint-Nazaire's dry dock infrastructure in a meaningful way, a ship, laden with explosives, would have to be sacrificed.
Built as the Wickes-class USS Buchanan (DD-131), HMS Campbeltown stood as a perfect example of the first class of oceanic destroyers put into service by the US Navy. Flush-decked, with four smoke stacks and strong torpedo armament, these ships were "just fine" by the end of World War I, but hopelessly obsolete by the 1940s. A total of 50 of them—an assorted fleet of Wickes, Caldwell and Clemson classes—were given to Britain in exchange for military bases in 1940.
After being renamed as HMS Campbeltown (I42), the destroyer served under both British and Dutch flags. It’s ironically speculated that the story of her career, plagued by collisions with other ships, might be the reason why, when looking for a ship to blow up, she was seen as a suitable candidate.
To prepare her for the mission, the ship was extensively modified. All of her guns and torpedo tubes were stripped down, while certain parts of her received additional armor to protect against small arms fire, and her silhouette was modified to somewhat resemble the German Raubvogel-class torpedo boats. Her main weapon for the assault was a load of twenty-four 400 lb depth charges, amounting to over 4 tons of explosive yield, concealed in a compartment just under the bow of the ship.
Apart from Campbeltown and a few other craft, the raiding force consisted of 346 Royal Navy sailors and 265 British Commandos.
During the course of their outward journey, the strike force managed to successfully avoid detection, despite a close brush with submarine U-593. However, the air raid that was supposed to distract the defenders didn’t work out too well. In fact, if anything, it only served to put them on higher alert. Even so, the assault convoy wasn’t spotted until it was just a few miles out from the port, and the modified appearance of Campbeltown caused some confusion among the German defenders, although not for long.
The flimsy old destroyer, intermittently illuminated by streams of tracer rounds that flew in from all directions, violently collided with the flat vertical surface of the gates at 01:34. Such was the force of the impact that the sailors and commandos onboard were knocked off their feet, and nine meters of the ship's bow plating was shorn clean off by the sturdy structure. As Campbeltown finally came to a dead stop, the commandos onboard jumped onto dry land to raid their shore objectives, and for the ship, all that was left to do was wait.
While the main objective was achieved, the Commandos had a very hard time in achieving it. Most of the motor launches were sunk, and even though the demolition teams were successful in carrying out their orders, it was impossible to successfully evacuate everyone afterwards. Out of roughly 100 Commandos ashore, most fought until they were out of ammunition before surrendering. Only 5 managed to escape captivity and return to England. Out of the assault fleet, only the Motor Gun Boat and five motor launches managed to make it back, loaded with survivors of the raid.
The final act wouldn’t happen until the next morning. German inspection crews boarded the partially wrecked ship, but failed to sight any of the explosives or fuses that were set to go off in a few hours' time. Meanwhile, German officers were interrogating Sam Beattie, the captured commander of Campbeltown. Knowing that his ship was going to detonate at any minute, he played the fool, giving his interrogators the impression that the collision was nothing more than the unintended result of incompetent piloting.
The gates were utterly demolished, and due to the damage caused by general flooding and the demolition charges, the dock remained out of service for the duration of the war. The only port on the Atlantic coast capable of providing shelter to German battleships was gone.
You can get ![]() 20,000 Coal!
20,000 Coal!
STRENGTHS: powerful 57 knot torpedoes with a 7.5 km range and high maximum speed of 35 knots.
WEAKNESSES: awkward main battery positioning.
TACTICAL TAKEAWAY: keep enemy ships at arm's length while using your torpedoes’ range to your advantage. Avoid close quarters gun duels.
![]() The Hotel Yankee signal flag is a must for history buffs.
The Hotel Yankee signal flag is a must for history buffs.
Relive historical tactics, defend your fleet, and forge your own legacy. The help is yours, Captain!